4/29/08

How to create a class in JavaScript

It turns out that JavaScript does not really support classes - weird... But there is a way to create them. Since everything is a function, create functions that that you need. Think of them as your class private methods. Start by creating a function that represents the constructor. In the constructor create methods and properties that connect to the private functions and variables using the assignment operator.

For example:


//privates
var firstName;
var lastName;
var isAdmin;
var hours = 0;


//constructor
function Worker(var workingHoursAWeek)
{
//passes personsAge to private var hours
hours = workingHoursAWeek;
//creates properties
this.FirstName = firstName;
this.LastName = lastName;
this.Hours= hours;
this.IsAdmin = isAdmin;


//create a method
this.IsBusy = isBusy;
}


//private function
function isBusy()
{
return (hours > 40) ? true : false;

}
Store the code in a separate .js file.
To use the class, include it in your .htm file
by passing it to scr


<script type="text/javascript" src="Worker.js"></script>

Now you can create an object and use it's properties and methods:

Worker denis = new Worker(40);
denis.Hours += 5;
if (denis.IsBusy) alert("help!");

_________________________________________________________

It is always great to see a working sample. Here I am going to use the exercise 11.16 from Deitel's "Internet & World Wide Web - How to program", which strangely does not show you how to create a class in JavaScript.
_________________________________________________________


Step 1. create a new JavaScript file "AirplaneReservationSystem.js" with the following code:


var SIZE;
var FIRST_CLASS_LIMIT;
var seats;

function AirplaneReservationSystem(size, firstClassLimit)
{
SIZE = size;
FIRST_CLASS_LIMIT = firstClassLimit;
seats = new Array(SIZE);
for(var i = 0; i < seats.length; i++)
seats[i] = "empty";
this.ReserveEconomy = reserveEconomy;
this.ReserveFirstClass = reserveFirstClass;
this.Seats = seats;
this.IsFull = IsFull;
}

function reserveEconomy()
{
var seat = -1;
for( var i = FIRST_CLASS_LIMIT; i <= SIZE; i++)
{
if(seats[i] == "empty")//if there are seats available
{
seats[i] = "full";
seat = i + 1;
i = SIZE;
}
}
return seat;
}

function reserveFirstClass()
{
var seat = -1;
for( var i = 0; i < FIRST_CLASS_LIMIT; i++)
{
if(seats[i] == "empty")
{
seats[i] = "full";
seat = i + 1;
i = FIRST_CLASS_LIMIT;
}
}
return seat;
}


function IsFull()
{
for(var i = 0; i <>(seats[i] == "empty")
return false; //found a seat
return true; //plane's full
}

Step 2.
create and .htm file where you can use the above class. Here is the code for it:

<!DOCTYPE html PUBLIC "-//W3C//DTD XHTML 1.0 Transitional//EN"
"http://www.w3.org/TR/xhtml1/DTD/xhtml1-transitional.dtd">
<html xmlns="http://www.w3.org/1999/xhtml">
<head>
<title>Excercise 11.16</title>
<script type="text/javascript" src="AirplaneReservationSystem.js"></script>
<script type="text/javascript">

    var SIZE = 9;
var FIRST_CLASS_LIMIT = 5;
var airplane = new AirplaneReservationSystem(SIZE, FIRST_CLASS_LIMIT);
var seat;
function ReserveSeat()
{
if(airplane.IsFull())
alert("Airplane is full");
else //reserve a seat
{
if(form.ticket[0].checked)//First Class
{
window.status = "Reserving First Class ticket...";
seat = airplane.ReserveFirstClass();
if(seat != -1)
window.status = "Reserved a seat number " + seat + " in FirstClass.";
else //first class is full
{
if(confirm("Can we try to place you in Economy?")==true)
{
seat = airplane.ReserveEconomy();
window.status = "Reserved a seat number " + seat + " in Economy.";
}
else
alert("Next plane leaves in 3 hours");
}
}
else if(form.ticket[1].checked)//Economy
{
window.status = "Reserving Economy ticket...";
seat = airplane.ReserveEconomy();
if(seat != -1)
window.status = "Reserved a seat number " + seat + " in Economy.";
else //economy is full
{
if(confirm("Can we try to place you in First Class?") == true)
{
seat = airplane.ReserveFirstClass();
window.status = "Reserved a seat number " + seat + " in FirstClass.";
}
else
alert("Next plane leaves in 3 hours");
}
}
else
alert("Select ticket type before reserving the seat");
}
}

</script>
</head>
<body>
<form name="form" action="">
<h1>Airline Reservation System</h1>
<br />
<br />
<p>
<input type="radio" name="ticket" value="FirstClass"/>
<label>First Class</label>
<br />
<input type="radio" name="ticket" value="Economy"/>
<label>Economy</label>
<br />
<br />
<input type="button" value="Reserve Seat" onclick="ReserveSeat()" />
</p>
<br />
<br />
<label>Result: </label>
<input name="Result" type="text" />
</form>
</body>
</html>
4/17/08

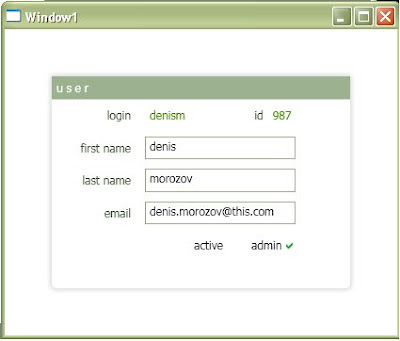
databind WPF controls sample

It's pretty simple:
Set the controls data context to the object that has the data, then bind specific properties.
Lets assume that you have a class User that has a property IsActive and you want to bind a checkbox to user.IsActive:

In code set the data context (note you can limit the scope to a particular control).

this.DataContext = user;

bind in XAML:
<CheckBox IsChecked="{Binding Path=IsActive}"/>


Here's a sample that has a simple user control with a couple of textboxes and checkboxes that use databinding to display data. The control pretends to need some user info. It stores it in one of its properties "CurrentUser". Once the property is populated it, the controls will display it:


First lets create a data container in the form of a class "User".


namespace BindingSample
{
public class User
{
public int Id { get; set; }
public bool IsActive { get; set; }
public bool IsAdmin { get; set; }
public string UserName { get; set; }
public string FirstName { get; set; }
public string LastName { get; set; }
public string Email { get; set; }
}
}


Then lets create a XAML UserControl - the main thing to note here is the binding code (in yellow):


<UserControl x:Class="BindingSample.formUser"
xmlns="http://schemas.microsoft.com/winfx/2006/xaml/presentation"
xmlns:x="http://schemas.microsoft.com/winfx/2006/xaml">
<Border CornerRadius="5" Margin="50" Background="White">
<Border.BitmapEffect>
<OuterGlowBitmapEffect GlowColor="LightGray"/>
</Border.BitmapEffect>
<StackPanel>
<!-- header -->
<Grid Background="#8AA37B" Opacity=".85">
<StackPanel Orientation="Horizontal">
<Label Foreground="White" FontSize="12">u s e r</Label>
</StackPanel>
</Grid>
<!-- body -->
<Grid >
<Grid.ColumnDefinitions>
<ColumnDefinition Width="10"/>
<ColumnDefinition Width="69*" />
<ColumnDefinition Width="70*" />
<ColumnDefinition Width="35*" />
<ColumnDefinition Width="10" />
</Grid.ColumnDefinitions>
<Grid.RowDefinitions>
<RowDefinition Height="Auto"/>

<RowDefinition Height="Auto"/>
</Grid.RowDefinitions>
<Label Grid.Row="0" Grid.Column="1" HorizontalContentAlignment="Right" Margin="5" Foreground="#435D36" FontSize="12">login</Label>
<StackPanel Grid.Row="0" Grid.Column="3" Grid.ColumnSpan="2" Margin="5" Orientation="Horizontal" FlowDirection="RightToLeft">
<Label Content="{Binding Path=Id}" Foreground="#458B00" FontSize="12"></Label>
<Label Foreground="#435D36" FontSize="12">id</Label>
</StackPanel>
<Label Grid.Row="1" Grid.Column="1" HorizontalContentAlignment="Right" Margin="5" Foreground="#435D36" FontSize="12"&gt;first name</Label>
<Label Grid.Row="2" Grid.Column="1" HorizontalContentAlignment="Right" Margin="5" Foreground="#435D36" FontSize="12">last name</Label>
<Label Grid.Row="3" Grid.Column="1" HorizontalContentAlignment="Right" Margin="5" Foreground="#435D36" FontSize="12">email</Label>
<Label Grid.Row="0" Grid.Column="2" Margin="5" Content="{Binding Path=UserName}" Foreground="#458B00" FontSize="12"></Label>
<TextBox Grid.Row="1" Grid.Column="2" Margin="5" Text="{Binding Path=FirstName}" Grid.ColumnSpan="3" BorderBrush="#8FA880" FontSize="12"></TextBox>
<TextBox Grid.Row="2" Grid.Column="2" Margin="5" Text="{Binding Path=LastName}" Grid.ColumnSpan="3" BorderBrush="#8FA880" FontSize="12"></TextBox>
<TextBox Grid.Row="3" Grid.Column="2" Margin="5" Text="{Binding Path=Email}" Grid.ColumnSpan="3" BorderBrush="#8FA880" FontSize="12"></TextBox>
<StackPanel Orientation="Horizontal" Grid.Row="6" Grid.Column="1" Grid.ColumnSpan="4" Margin="5" FlowDirection="RightToLeft">
<CheckBox Margin="0,5,15,5" BorderBrush="Transparent" Background="Transparent" FlowDirection="RightToLeft" IsChecked="{Binding Path=IsAdmin}" FontSize="12" >admin</CheckBox>
<CheckBox Margin="0,5,5,5" BorderBrush="Transparent" Background="Transparent" FlowDirection="RightToLeft" IsChecked="{Binding Path=IsActive}" FontSize="12" >active</CheckBox>
</StackPanel>
</Grid>
</StackPanel>
</Border>
</UserControl>


In control's code, lets create a property CurrentUser, there we can set the data context:


namespace BindingSample
{
/// <summary>
/// Interaction logic for formUser.xaml
/// </summary>

public partial class formUser : UserControl
{
private User currentUser = new User();

public formUser()
{
InitializeComponent();
}

public User CurrentUser
{
get { return this.currentUser; }
set
{
this.currentUser = value;
this.DataContext = currentUser;
}
}
}
}
Next step is to create a window and instanciate the control that was created above: (create a new XAML file) and add the control:


<Window x:Class="BindingSample.Window1"
xmlns="http://schemas.microsoft.com/winfx/2006/xaml/presentation"
xmlns:x="http://schemas.microsoft.com/winfx/2006/xaml"
xmlns:local="clr-namespace:BindingSample"
Title="Window1" Height="300" Width="300">
<Grid>
<local:formUser x:Name="formUserDetail"/>
</Grid>
</Window>


And in code behind, lets populate the user and pass it to the control:

namespace BindingSample
{
/// <summary>
/// Interaction logic for Window1.xaml
/// </summary>

public partial class Window1 : Window
{
private User user;

public Window1()
{
/*create a user*/
user = new User();
user.Id = 987;
user.IsActive = false;
user.IsAdmin = true;
user.UserName = "denism";
user.FirstName = "denis";
user.LastName = "morozov";
user.Email = "denis.morozov@this.com";

InitializeComponent();

this.formUserDetail.CurrentUser = user;
}
}
}

2/14/08

ClickOnce - how to update publish.htm with MSBuild

When publishing ClickOnce application using Visual Studio, the publish.htm page is created automatically. If you use MSBuild for publishing, then soon you will realize that MSBuild does not offer same functionality, so you either have to build your own page or use the prebuilt publish.htm, check it into the source control and edit it every time you have a build.

To automate the process a little bit, I used the prebuilt page that is created by VisualStudio and checked it in my source control. Then used my MSBuild .proj file to update the version and copy it to my publish location. Since HTML is XML, you can use task.

If you are about to use publish.htm created by Visual Studio, there were a couple of things that you should know. That publish.htm file probably does not comply with XML standards. So test it. A simple check would be to create a .NET app with these two lines of code:


XmlDocument xmlDoc = new XmlDocument();
xmlDoc.Load(@"C:\Source\WinDTS_NET_3_5\BuildTools\Publish.htm");


If it loads, you are good to go. My page did not load. I had a problem with Visual Studio spacers ("&spns", about 8 of them). Originally I just removed them, but then to save the look of the page I replaced them with:

<SPACER TYPE="block" WIDTH="20" HEIGHT="1" />

When the .htm page is XLM ready, it's time to go back to MSBuild! You can use task provided by MSBuild.Community.Tasks found at http://msbuildtasks.tigris.org/ (the site shows you how to get started and reference the library).

Here's the snipet that updates my publish.htm file:


  <Target Name="UpdatePublishPage"
<XmlUpdate XmlFileName="$(YourPath)\Publish.htm"
XPath="HTML/BODY/TABLE/TR/TD/TABLE/TR/TD/TABLE/TR/APPINFO/TD"
Value="$(Major).$(Minor).$(Build).$(Revision)">
</XmlUpdate>
</Target>
Note that the XPath has "APPINFO" tag. In publish.htm I found the tags that specify the build version of my application and incapsulated them in "APPINFO". That way my XPath can find and manipulate just that part of html:

<APPINFO>
<TD>2.0.0.22103</TD>
</APPINFO>

Finally, when the publish.htm is updated, use MSBuild task to copy it to the your publish folder:

<Copy SourceFiles="$(MyPath)\Publish.htm" DestinationFolder="$(PublishFolder)"/>

That's it!


...to a comment 1: the Target is all there, the only thing that I ommitted was Dependency on another target. I took it out for simplicity sake:

<Target Name="UpdateVersionFile" DependsOnTargets="GetBuildVersion">
<AssemblyInfo
CodeLanguage="CS"
OutputFile="AssemblyVersion.cs"
AssemblyVersion="$(Major).$(Minor).$(Build).$(Revision)"
AssemblyFileVersion="$(Major).$(Minor).$(Build).$(Revision)" />
</Target>

after you declare a target then you can call it.
For example, at some point some other target such as "DoMYBuild" maybe will call your UpdateVersionFile:

<Target Name="DoMYBuild">
<CallTarget Targets="Clean;GetNewFiles;Build;UpdateVersionFile">
</Target>

1/21/08

How to change size of WPF controls at runtime

This sample code uses mouse events to change the size UI elements on Canvas. Stretching is only done for usual bottom, right and bottom-right of the control - you can do top and left in a similar fashion. For controls I used 3 rectangles (actually borders containing rectangles). All three controls are identical except for the names. Note, that each has a TranslateTransform in the TransformGroup. The C# code uses LINQ query to get the right transform from the group before applying new coordinates to it for dragging. This sample also includes the changing of the Z Order to maintain the control that is on top.

Check out a short video below XAML code. It shows what compiled XAML looks like and demostrates dragging and resizing.

* * * * * * * * * * * * *
* Here's the XAML code: *

* * * * * * * * * * * * *


<Window x:Class="MoveObjectOnMouseDownUpMove.Window1"

xmlns="http://schemas.microsoft.com/winfx/2006/xaml/presentation"
xmlns:x="http://schemas.microsoft.com/winfx/2006/xaml"
Title="Window1" Height="300" Width="300">
<Canvas x:Name="canvas" MouseMove="Canvas_MouseMove">

<Border Name="border1" Canvas.Left="123" Canvas.Top="35"
BorderBrush="DarkKhaki" BorderThickness="1" CornerRadius="5" Padding="5"
Height="68" Width="68" MinHeight="10" MinWidth="10"
MouseLeftButtonDown="border_MouseLeftButtonDown"
MouseLeave="border_MouseLeave"
MouseEnter="border_MouseEnter">
<Border.BitmapEffect>
<DropShadowBitmapEffect Color="DarkGray"/>

</Border.BitmapEffect>
<Border.RenderTransform>
<TransformGroup>
<ScaleTransform/>
<TranslateTransform/>
</TransformGroup>
</Border.RenderTransform>
<Rectangle x:Name="rect" Fill="DarkKhaki" RadiusX="5" RadiusY="5"/>

</Border>
<Border Name="border2" Canvas.Left="123" Canvas.Top="35"
BorderBrush="DarkKhaki" BorderThickness="1" CornerRadius="5" Padding="5"
Height="68" Width="68" MinHeight="10" MinWidth="10"
MouseLeftButtonDown="border_MouseLeftButtonDown"
MouseLeave="border_MouseLeave"
MouseEnter="border_MouseEnter">
<Border.BitmapEffect>
<DropShadowBitmapEffect Color="DarkGray"/>
</Border.BitmapEffect>
<Border.RenderTransform>
<TransformGroup>
<ScaleTransform/>
<TranslateTransform/>
</TransformGroup>
</Border.RenderTransform>
<Rectangle x:Name="rect" Fill="DarkKhaki" RadiusX="5" RadiusY="5"/>

</Border>
<Border Name="border3" Canvas.Left="123" Canvas.Top="35"
BorderBrush="DarkKhaki" BorderThickness="1" CornerRadius="5" Padding="5"
Height="68" Width="68" MinHeight="10" MinWidth="10"
MouseLeftButtonDown="border_MouseLeftButtonDown"
MouseLeave="border_MouseLeave"
MouseEnter="border_MouseEnter">
<Border.BitmapEffect>
<DropShadowBitmapEffect Color="DarkGray"/>
</Border.BitmapEffect>
<Border.RenderTransform>
<TransformGroup>
<ScaleTransform/>
<TranslateTransform/>
</TransformGroup>
</Border.RenderTransform>
<Rectangle x:Name="rect" Fill="DarkKhaki" RadiusX="5" RadiusY="5"/>
</Border>
</Canvas>
</Window>

When you compile XAML Code, it will look the image below. Before starting to go into C# file to add logic to the events created in XAML, check out the video to see the dragging, resizing and maintaining of the z Order.


* * * * * * * * * * * * * * * * * * *
Here's the C# code
* * * * * * * * * * * * * * * * * * *


public partial class Window1 : Window
{
private Element current = new Element();
public Window1()
{
InitializeComponent();
}


protected override void OnMouseLeftButtonDown(MouseButtonEventArgs e)
{
base.OnMouseLeftButtonDown(e);
this.current.X = Mouse.GetPosition(this.canvas).X;
this.current.Y = Mouse.GetPosition(this.canvas).Y;

if(this.current.InputElement != null)
this.current.InputElement.CaptureMouse();

if (!this.current.IsStretching)
this.current.IsDragging = true;
}
protected override void OnMouseLeftButtonUp(MouseButtonEventArgs e)
{
base.OnMouseLeftButtonUp(e);

if (this.current.InputElement != null)
this.current.InputElement.ReleaseMouseCapture();

this.Cursor = Cursors.Arrow;
}

private void Canvas_MouseMove(object sender, MouseEventArgs e)
{
if ( e.LeftButton == MouseButtonState.Pressed &&
current.InputElement != null)
{
//increment z-Order and pass it to the current element,
//so that it stays on top of all other elements

((Border)this.current.InputElement).SetValue(Canvas.ZIndexProperty, this.current.ZIndex++);

if (this.current.IsDragging)
Drag(sender);

if (this.current.IsStretching)
Stretch(sender);
}
}

private void border_MouseLeftButtonDown(object sender, MouseButtonEventArgs e)
{
//capture the last highest z index before pointing to new current element
int newZIndex = (int)((Border)sender).GetValue(Canvas.ZIndexProperty);
this.current.ZIndex = newZIndex > this.current.ZIndex ? newZIndex : this.current.ZIndex;

//capture the new current element
this.current.InputElement = (IInputElement)sender;
}
private void border_MouseLeave(object sender, MouseEventArgs e)
{
if (e.LeftButton == MouseButtonState.Pressed)
return;

// get coordinates
Border border = (Border)sender;
var rightLimit = border.ActualWidth - border.Padding.Right;
var bottomLimit = border.ActualHeight - border.Padding.Bottom;
var x = Mouse.GetPosition((IInputElement)sender).X;
var y = Mouse.GetPosition((IInputElement)sender).Y;

// figure out stretching directions - only to Right, Bottom
bool stretchRight = (x >= rightLimit && x < border.ActualWidth) ? true : false;
bool stretchBottom = (y >= bottomLimit && y < border.ActualHeight) ? true : false;

// update current element
this.current.InputElement = (IInputElement)sender;
this.current.X = x;
this.current.Y = y;
this.current.IsStretching = true;

//set cursor to show stretch direction
if (stretchRight && stretchBottom)
{
this.Cursor = Cursors.SizeNWSE;
return;
}
else if (stretchRight && !stretchBottom)
{
this.Cursor = Cursors.SizeWE;
return;
}
else if (stretchBottom && !stretchRight)
{
this.Cursor = Cursors.SizeNS;
return;
}
else //no stretch
{
this.Cursor = Cursors.Arrow;
this.current.IsStretching = false;
}
}
private void border_MouseEnter(object sender, MouseEventArgs e)
{
Border border = (Border)sender;

var rightLimit = border.ActualWidth - border.Padding.Right;
var bottomLimit = border.ActualHeight - border.Padding.Bottom;

var x = Mouse.GetPosition((IInputElement)sender).X;
var y = Mouse.GetPosition((IInputElement)sender).Y;

if (x < rightLimit && y < bottomLimit)
this.Cursor = Cursors.Arrow;
}

private void Drag(object sender)
{
this.Cursor = Cursors.Hand;

// Retrieve the current position of the mouse.
var newX = Mouse.GetPosition((IInputElement)sender).X;
var newY = Mouse.GetPosition((IInputElement)sender).Y;

// Reset the location of the object (add to sender's renderTransform newPosition minus currentElement's position
var transformGroup = ((UIElement)this.current.InputElement).RenderTransform as TransformGroup;
if (transformGroup == null)
return;

var translateTransforms = from transform in transformGroup.Children
where transform.GetType().Name == "TranslateTransform"
select transform;

foreach (TranslateTransform tt in translateTransforms)
{
tt.X += newX - current.X;
tt.Y += newY - current.Y;
}

// Update the beginning position of the mouse
current.X = newX;
current.Y = newY;
}
private void Stretch(object sender)
{

// Retrieve the current position of the mouse.
var mousePosX = Mouse.GetPosition((IInputElement)sender).X;
var mousePosY = Mouse.GetPosition((IInputElement)sender).Y;


//get coordinates
Border border = (Border)this.current.InputElement;
var xDiff = mousePosX - this.current.X;
var yDiff = mousePosY - this.current.Y;
var width = ((Border)this.current.InputElement).Width;
var heigth = ((Border)this.current.InputElement).Height;


//make sure not to resize to negative width or heigth
xDiff = (border.Width + xDiff) > border.MinWidth ? xDiff : border.MinWidth;
yDiff = (border.Height + yDiff) > border.MinHeight ? yDiff : border.MinHeight;


// stretchRight && stretchBottom ?
if (this.Cursor == Cursors.SizeNWSE)
{
((Border)this.current.InputElement).Width += xDiff;
((Border)this.current.InputElement).Height += yDiff;
}
// stretchRight ?
else if (this.Cursor == Cursors.SizeWE)
((Border)this.current.InputElement).Width += xDiff;

// stretchBottom ?
else if (this.Cursor == Cursors.SizeNS)
((Border)this.current.InputElement).Height += yDiff;

//no stretch
else
{
this.Cursor = Cursors.Arrow;
this.current.IsStretching = false;
}

// update current coordinates with the latest postion of the mouse
this.current.X = mousePosX;
this.current.Y = mousePosY;
}
}


public class Element
{
#region Fields
private bool isDragging = false;
private bool isStretching = false;
private bool stretchLeft = false;
private bool stretchRight = false;
private IInputElement inputElement = null;
private double x, y = 0;
private int zIndex
= 0;
#endregion

#region Constructor
public Element(){}
#endregion

#region Properties
public IInputElement InputElement
{
get { return this.inputElement; }
set
{
this.inputElement = value;
this.isDragging = false;
this.isStretching = false;
}
}
public double X
{
get { return this.x; }
set { this.x = value; }
}
public double Y
{
get { return this.y; }
set { this.y = value; }
}
public int ZIndex
{
get { return this.zIndex; }
set { this.zIndex = value; }
}
public bool IsDragging
{
get { return this.isDragging; }
set
{
this.isDragging = value;
this.isStretching = !this.isDragging;
}
}
public bool IsStretching
{
get { return this.isStretching; }
set
{
this.isStretching = value;
this.IsDragging = !this.isStretching;
}
}
public bool StretchLeft
{
get { return this.stretchLeft; }
set { this.stretchLeft = value; this.stretchRight = !this.stretchLeft; }
}
public bool StretchRight
{
get { return this.stretchRight; }
set { this.stretchRight = value; this.stretchLeft = !this.stretchRight; }
}
#endregion
}
}
_________________________________________________________________
end of post